DieseRC’s universal wireless remote control switch offers a convenient solution for managing electrical devices, boasting a 4-channel RF relay receiver for versatile control.
This system, detailed in the manual, enables wireless operation of garage doors, lights, motors, and curtains, functioning on AC 110V-240V with reliable performance.
Featuring EV1527 decoding and a focus on simplicity, DieseRC provides user-friendly wireless remote control products, including integrated circuits and remote relay controllers.
What is a DieseRC Remote Control Switch?
A DieseRC wireless remote control switch represents a sophisticated yet accessible method for remotely managing electrical systems and appliances, eliminating the constraints of traditional wiring. This innovative device comprises two core components: a receiver module and a remote transmitter, working in tandem to provide seamless control.
Essentially, the receiver module connects to the device you wish to control – be it a garage door, lighting fixture, or motor – while the remote transmitter acts as your command center, sending radio frequency (RF) signals to activate or deactivate the connected device. The manual details how this system operates on a 433MHz frequency, ensuring stable and reliable performance.
DieseRC specializes in crafting these solutions, focusing on convenience, energy efficiency, and safety. Their products, including this remote control switch, are designed for ease of use, making automation accessible to a wide range of users. The system utilizes learning code technology (EV1527 decoding) for secure and personalized operation.
Key Features and Benefits
The DieseRC Universal Wireless Remote Control Switch boasts several key features, as outlined in the manual, delivering significant benefits to users. Its 4-channel RF relay receiver provides versatility, allowing control of multiple devices with a single transmitter. Operating on AC 110V-240V, it’s adaptable to various power systems.
A primary benefit is the convenience of wireless control, eliminating the need for complex wiring or physical access to devices. The system’s high reception sensitivity ensures reliable operation, even at a distance. Furthermore, the inclusion of EV1527 decoding enhances security and prevents unauthorized access.
DieseRC prioritizes user-friendliness, offering a simple setup process and intuitive operation. The switch supports multiple operating modes – momentary, toggle, and latched – catering to diverse application requirements. This translates to a convenient, energy-saving, and efficient remote control solution.
Typical Applications (Garage Doors, Lights, Motors)
As detailed in the manual, the DieseRC Wireless Remote Control Switch excels in a wide range of applications, offering convenient wireless control. A common use is automating garage doors, providing secure and effortless access. It’s also ideal for controlling indoor and outdoor lighting, enhancing convenience and energy efficiency.
Furthermore, the switch is perfectly suited for managing electric motors, such as those found in window treatments or ventilation systems. Electric curtains benefit greatly from wireless operation, adding a touch of modern convenience. The system’s 10A relay capacity ensures compatibility with various motor types.
DieseRC’s solution simplifies automation projects, eliminating the need for extensive wiring. Its versatility makes it a valuable asset for both residential and commercial settings, offering a reliable and user-friendly remote control experience.
Product Components
The DieseRC system, as outlined in the manual, comprises a receiver module and a remote transmitter, working together for wireless control of electrical devices.
Additionally, the package includes necessary accessories to facilitate a straightforward installation and immediate operation of the remote control switch.
Receiver Module Overview
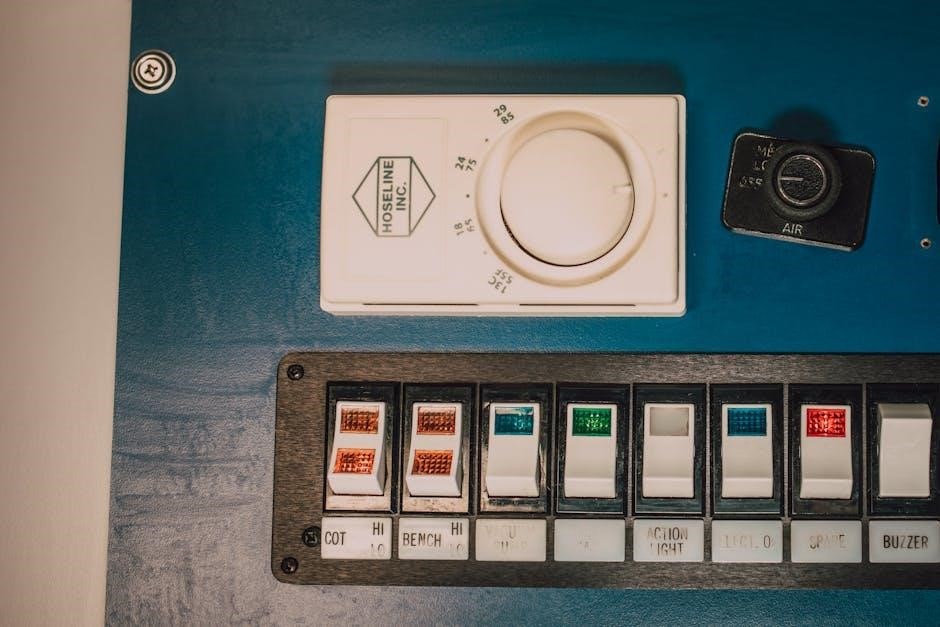
The DieseRC receiver module, detailed within the manual, serves as the central control unit for your wireless system. This 4-channel RF relay receiver board is designed to accept signals from the remote transmitter and activate or deactivate connected electrical devices.
It operates on a standard AC 110V-240V power supply, ensuring compatibility with most household electrical systems. The module boasts high reception sensitivity, providing a reliable connection even at a distance. Its robust construction guarantees stable and dependable performance.
Internally, the receiver utilizes EV1527 decoding to securely interpret signals from compatible transmitters. Each of the four channels can be independently controlled, allowing for versatile applications. The manual provides a clear diagram illustrating the receiver’s terminal connections for easy wiring and setup. Proper installation, as described in the manual, is crucial for optimal functionality.
Remote Transmitter Overview
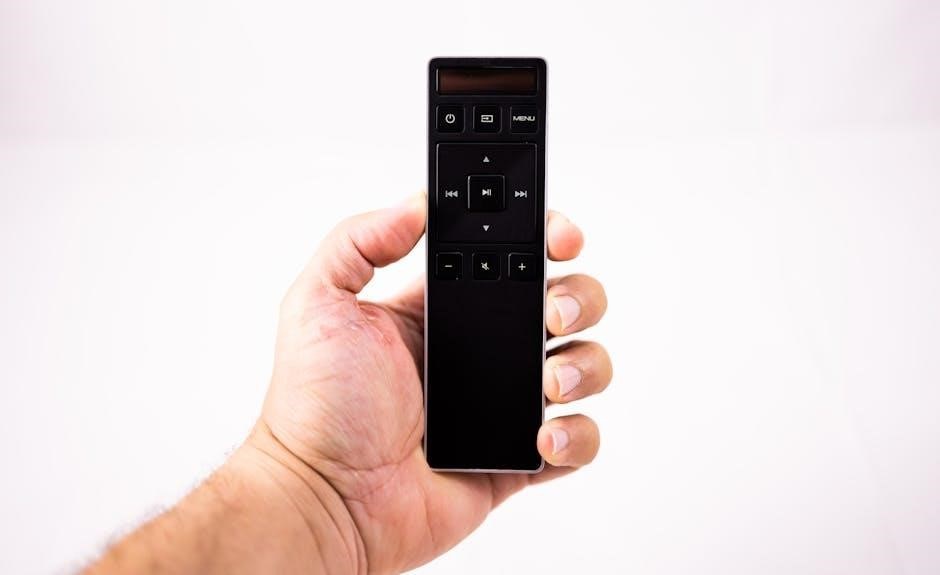
The DieseRC remote transmitter, as explained in the manual, is the user interface for controlling the receiver module and, consequently, your connected devices. This handheld device sends radio frequency (RF) signals to the receiver, initiating actions like turning lights on/off or operating a garage door.
Operating on a 433MHz frequency, the transmitter ensures a stable and reliable connection. It’s designed for ease of use, typically featuring multiple buttons corresponding to the different channels on the receiver. The manual details how each button correlates to a specific output.
Power is supplied by readily available batteries (installation instructions are in the manual). The transmitter incorporates a learning code function, utilizing EV1527 decoding, to establish a secure connection with the receiver, preventing unauthorized control. The manual guides you through the pairing process for seamless operation.
Included Accessories
Upon opening your DieseRC Wireless Remote Control Switch package, as detailed in the manual, you’ll find several key components to get you started. Primarily, the package contains one receiver module, the central hub for controlling your devices. Alongside this, you’ll receive at least one remote transmitter, enabling wireless operation from a distance.
The manual also confirms the inclusion of necessary cabling for connecting the receiver to your power source and the devices you intend to control. While specific cable types may vary based on the model, the manual provides clear diagrams for proper connection.
Furthermore, a concise user manual is included, offering step-by-step instructions for installation, setup, and troubleshooting. Some packages may also contain mounting hardware, such as screws and brackets, for secure receiver placement. Refer to the packaging list within the manual to verify all components are present.
Technical Specifications
DieseRC’s remote control switch, as outlined in the manual, operates on AC 110V-240V or DC 12V/24V, utilizing a 433MHz frequency.
The system boasts a 10A relay capacity, ensuring compatibility with a wide range of electrical devices, detailed within the product manual.
Operating Voltage (AC 110V-240V, DC 12V/24V)
DieseRC’s wireless remote control switch demonstrates exceptional versatility in its power supply options, as thoroughly explained in the product manual. The receiver module is designed to accommodate both AC and DC power sources, providing broad applicability across diverse electrical systems.
Specifically, the device supports an AC input voltage range of 110V to 240V, making it suitable for use in regions with varying electrical standards. Furthermore, it also functions effectively with DC power sources of 12V or 24V, expanding its compatibility to include battery-powered or low-voltage applications.
This dual-voltage capability, detailed in the manual, simplifies installation and integration, eliminating the need for separate power adapters or converters in many scenarios. Always consult the manual and ensure the selected voltage matches your specific application requirements for optimal performance and safety.
Frequency (433MHz)
The DieseRC Universal Wireless Remote Control Switch, as detailed in its comprehensive manual, operates on a radio frequency of 433MHz. This frequency is a widely adopted standard for short-range wireless communication, offering a balance between range and reliability.
Utilizing 433MHz allows for effective signal transmission through common building materials, though performance can be affected by interference from other devices operating on similar frequencies. The manual emphasizes the importance of minimizing obstructions between the remote transmitter and the receiver module for optimal operation.
This frequency choice contributes to the system’s stable and reliable performance, ensuring consistent control of connected devices. Refer to the manual for information regarding potential interference and best practices for maximizing signal strength and range within your specific environment.
Relay Capacity (10A)
The DieseRC Wireless Remote Control Switch, as outlined in the product manual, is equipped with relays capable of handling a maximum load of 10 Amperes (10A). This specification is crucial for ensuring safe and reliable operation of connected electrical devices.
The manual strongly advises users to verify that the power consumption of any device connected to the receiver does not exceed this 10A limit. Exceeding this capacity can lead to damage to the relay, the receiver module, or the connected device, and may pose a safety hazard.
Properly assessing the amperage requirements of your appliances, as detailed in the manual, is essential before connecting them to the DieseRC system. This ensures long-term performance and prevents potential electrical issues.

Setting Up the System
The manual guides users through a straightforward setup process, encompassing receiver module installation, transmitter battery insertion, and a crucial learning/pairing procedure.
Utilizing EV1527 decoding, the manual details how to synchronize the transmitter and receiver for seamless wireless control of your desired electrical devices.
Receiver Module Installation
Before beginning, ensure the power supply to the intended circuit is completely disconnected to prevent electrical shock. The DieseRC receiver module, as detailed in the manual, is designed for flexible mounting options.
Carefully select a location that provides adequate ventilation and protection from moisture. Securely mount the receiver using screws or adhesive tape, ensuring it’s stable and won’t vibrate loose. Connect the AC 110V-240V or DC 12V/24V power supply to the designated terminals, observing correct polarity.
Next, connect the load (e.g., light, motor) to the relay output terminals. Refer to the wiring diagram in the manual for proper connections. Double-check all wiring before restoring power, verifying that connections are secure and insulated. Incorrect wiring can damage the module or create a safety hazard.
Always consult a qualified electrician if you are unsure about any aspect of the installation process.
Transmitter Battery Installation
The DieseRC remote transmitter requires batteries for operation, as outlined in the product manual. Typically, these transmitters utilize button cell batteries, such as CR2025 or similar, depending on the specific model. Locate the battery compartment on the transmitter, usually accessible via a sliding cover or small screws.
Carefully open the compartment and insert the battery, ensuring correct polarity (+ and -) as indicated inside. Incorrect battery installation will prevent the transmitter from functioning. Once the battery is in place, securely close the compartment cover to prevent accidental dislodgement.
After battery installation, test the transmitter’s functionality by pressing a button. If the transmitter doesn’t respond, double-check the battery polarity and ensure the battery is fresh. Replace the battery with a new one if necessary, following local regulations for battery disposal.
Learning Code/Pairing Procedure (EV1527 Decoding)
The DieseRC system utilizes EV1527 decoding for secure pairing, detailed in the manual. To pair a transmitter with the receiver, initiate the learning process. Locate the “Learn” or “Code” button on the receiver module. Press and hold this button until the indicator LED begins to flash, signaling it’s in learning mode.

Within this timeframe (typically seconds), press any button on the transmitter you wish to pair. The receiver should acknowledge the signal with a flash or beep, confirming successful pairing. Repeat this process for each additional transmitter you want to add to the system.
If pairing fails, ensure the transmitter battery is fresh and you are within range. Clearing existing codes may be necessary; consult the manual for reset instructions. EV1527 decoding ensures only authorized transmitters can control the receiver.
Operating Modes
DieseRC’s remote control switch supports versatile operation with momentary, toggle, and latched modes, adapting to diverse applications as outlined in the manual.
These modes provide flexibility for controlling lights, motors, and other devices, offering customized functionality for various user preferences and system requirements.
Momentary Mode
Momentary Mode, as detailed in the DieseRC manual, operates on a press-and-hold principle; the connected device activates only while the button on the remote transmitter is actively pressed.
Releasing the button immediately deactivates the device, making this mode ideal for applications requiring temporary control, such as activating a siren, briefly operating a pump, or controlling a temporary lighting fixture.
This functionality ensures that the device doesn’t remain powered on unintentionally, enhancing safety and preventing unnecessary energy consumption. The manual emphasizes that this mode is particularly useful when precise, timed control is needed.
For example, a user could momentarily activate a gate opener or a short-duration alarm system. The DieseRC system’s responsiveness ensures immediate activation and deactivation, providing reliable and controlled operation in momentary applications.
Understanding this mode is crucial for maximizing the versatility of your remote control switch.
Toggle Mode
Toggle Mode, as explained in the DieseRC manual, allows for a simple on/off control scheme with each press of the button on the remote transmitter.
Pressing the button once activates the connected device, and pressing it again deactivates it, effectively “toggling” between states. This mode is perfect for controlling lights, fans, or any appliance where a simple on/off function is desired.
Unlike Momentary Mode, no continuous button press is required; a single click changes the device’s status. The manual highlights its convenience for everyday applications, eliminating the need to hold the button down.
Imagine controlling a lamp – one press turns it on, another turns it off. This intuitive operation makes Toggle Mode user-friendly and efficient. The DieseRC system ensures reliable state changes with each button press.
This mode provides a straightforward and practical solution for basic remote control needs.
Latched Mode
The DieseRC manual details Latched Mode as a unique operational setting where the relay remains activated after a single button press on the remote transmitter, irrespective of continued button holding.
Crucially, a second press of the button is required to deactivate the relay and return it to its original state. This differs significantly from both Toggle and Momentary Modes, offering a distinct control dynamic.
This mode is particularly useful for applications requiring a sustained activation, such as controlling a door lock or activating a siren. The manual emphasizes its suitability for scenarios needing a definite on/off sequence.
Unlike Toggle Mode, the state isn’t reversed with each press; it’s a single activation requiring a separate deactivation command. Latched Mode provides a secure and reliable control method for specific applications.
The manual provides clear instructions for configuring and utilizing this powerful feature.

Troubleshooting
DieseRC’s manual offers solutions for common issues like a non-responsive remote, a receiver failing to power on, or a relay that won’t activate.
It guides users through diagnosing and resolving these problems, ensuring optimal performance of the wireless remote control switch system.
Remote Not Responding
If your DieseRC remote transmitter isn’t responding, first check the battery installation, ensuring correct polarity. A weak battery is the most frequent cause of this issue; replace it with a fresh one. Verify that there’s no significant wireless interference nearby, as other devices operating on the 433MHz frequency can disrupt the signal.
Next, confirm that the remote is within the operational range of the receiver module. Excessive distance can weaken the signal. Attempt re-pairing the remote with the receiver using the learning code/pairing procedure outlined in the manual (EV1527 decoding). This re-establishes communication between the two components.
Inspect the remote’s buttons for any physical damage or obstructions. If the problem persists, consult the full manual for further diagnostic steps or contact DieseRC support for assistance. Remember to always refer to the safety precautions detailed within the documentation.
Receiver Not Powering On
If the DieseRC receiver module fails to power on, begin by verifying the power supply connection. Ensure the input voltage (AC 110V-240V or DC 12V/24V, as applicable) matches the receiver’s specifications and is securely connected. Check the power source itself – is it functioning correctly?
Inspect the power cable for any damage or loose connections. A faulty cable can prevent power from reaching the receiver. Confirm that the receiver’s fuse (if equipped) hasn’t blown; replace it with a fuse of the correct amperage rating if necessary.
Consult the manual for specific wiring diagrams and polarity requirements. Incorrect wiring can damage the receiver. If the issue persists, carefully review the technical specifications and safety guidelines. Contact DieseRC support for further troubleshooting assistance, referencing your model number.
Relay Not Activating
If the DieseRC receiver is powered on but the relay isn’t activating, first confirm successful pairing between the transmitter and receiver, as detailed in the manual’s learning code/pairing procedure. Ensure the transmitter is sending the correct signal for the desired channel.
Verify the connected load doesn’t exceed the relay’s capacity (10A). Overloading the relay can prevent activation and potentially damage the system. Check the wiring to the load – are all connections secure and correct? Inspect for any short circuits or open circuits.
Test the transmitter with fresh batteries. A weak signal may not reach the receiver. If problems continue, consult the troubleshooting section of the manual or contact DieseRC support, providing your model number for assistance.

Safety Precautions
Always adhere to electrical safety guidelines during installation and operation, avoiding wireless interference and ensuring proper usage as outlined in the manual.
Prioritize safe handling and operation of the DieseRC remote control switch to prevent electrical hazards and maintain system reliability.
Electrical Safety Guidelines
Important Safety Information: Before installing or operating your DieseRC Wireless Remote Control Switch, carefully review these electrical safety guidelines detailed within this manual. Incorrect installation or misuse could result in electric shock or fire hazard.
Disconnect Power: Always disconnect the main power supply before making any electrical connections to the receiver module. This prevents accidental shock and damage to the device. Verify power is off using a suitable testing device.
Wiring: Ensure all wiring connections are secure and comply with local electrical codes. Use appropriately sized wiring for the load being controlled. Improper wiring can lead to overheating and potential fire risks.
Qualified Personnel: Installation should be performed by a qualified electrician if you are not comfortable working with electrical wiring. Seek professional assistance to ensure a safe and compliant installation.
Grounding: Properly ground the receiver module to prevent electrical shock and ensure stable operation. Follow the grounding instructions provided in this manual.
Water & Moisture: Keep the receiver module away from water and moisture. Do not use it in damp or wet environments. Protect it from rain and splashes.
Wireless Interference Considerations
Understanding Interference: The DieseRC Wireless Remote Control Switch operates on the 433MHz frequency, which, like all wireless signals, can be susceptible to interference. This manual section details potential sources and mitigation strategies.
Common Sources: Interference can originate from other 433MHz devices, Wi-Fi routers, microwave ovens, and even certain types of lighting. These signals can disrupt communication between the transmitter and receiver.
Range Limitations: Wireless range is affected by obstacles like walls, metal objects, and distance. Thick walls or metal structures significantly reduce signal strength. Keep the receiver within a reasonable distance of the transmitter.
Minimizing Interference: Relocate the receiver or transmitter away from potential interference sources. Reduce the number of wireless devices operating on the 433MHz band in the vicinity. Ensure clear line of sight whenever possible.
Testing: If experiencing issues, test the system in different locations to identify areas with stronger signal reception. Consult the troubleshooting section of this manual for further assistance.
Proper Usage and Handling
This section of the DieseRC Remote Control Switch manual outlines essential guidelines for safe and effective operation. Always adhere to these instructions to ensure longevity and prevent potential hazards.
Avoid Overloading: Do not exceed the relay’s maximum capacity of 10A. Overloading can damage the receiver and create a fire risk. Verify the power requirements of connected devices.
Environmental Conditions: Protect the receiver from moisture, extreme temperatures, and direct sunlight. Indoor use is recommended for optimal performance and to prevent corrosion.
Handling Precautions: Avoid dropping or subjecting the receiver and transmitter to physical shock. Handle with care to prevent damage to internal components.
Regular Inspection: Periodically inspect the wiring and connections for any signs of wear or damage. Replace damaged components immediately. Refer to the troubleshooting section of this manual.
Disconnection: Disconnect power before performing any maintenance or modifications.

Advanced Features
DieseRC’s system allows control of multiple receivers with a single transmitter, expanding your wireless network’s capabilities, as detailed in this manual.
Furthermore, seamless integration with existing smart home systems is possible, enhancing convenience and automation for a connected lifestyle.
Explore these features for a truly customized and efficient remote control experience.
Multiple Receiver Control with One Transmitter
DieseRC’s wireless remote control system offers the powerful capability to manage numerous receiver modules utilizing a single transmitter unit, significantly expanding the scope of your wireless control network.
This feature, thoroughly explained within this manual, is particularly beneficial for larger installations or environments requiring centralized control over a diverse range of electrical devices. Imagine effortlessly operating lights throughout an entire property, or simultaneously controlling multiple garage doors – all from one convenient handheld transmitter.
To achieve this, each receiver module must be individually programmed to recognize the transmitter’s signal. The learning code/pairing procedure, utilizing EV1527 decoding, detailed in the ‘Setting Up the System’ section, must be repeated for each receiver. This ensures that each receiver responds uniquely to the transmitter, preventing unintended simultaneous activation.
Carefully follow the instructions in this manual to avoid interference and ensure reliable operation of all connected devices.
Integration with Smart Home Systems
DieseRC’s wireless remote control switch, while a standalone solution, possesses the potential for integration into broader smart home ecosystems, enhancing automation and convenience as detailed in this manual.
Although not natively compatible with all platforms, the relay output of the receiver module can be interfaced with smart home hubs and controllers utilizing various methods. This often involves connecting the relay output to a compatible input on the hub, allowing the remote control signal to trigger automated scenes or routines.
For example, a DieseRC switch controlling a garage door could be integrated to automatically close the door at a scheduled time or upon a specific event. This manual provides guidance on understanding the relay functionality, crucial for successful integration.
Explore online resources and community forums for specific integration instructions tailored to your chosen smart home platform.